How Does Diamond Painting Work?
Diamond painting has taken the crafting world by storm, captivating enthusiasts with its mesmerizing and therapeutic nature. If you’ve ever wondered how those sparkling, intricate designs come to life, then you’re in the right place.
In this article, we will explore the fascinating world of diamond painting, unraveling its process, materials, and tips for success. So, let’s dive in and discover how this art form allows you to create stunning masterpieces, one dazzling diamond at a time.
What is Diamond Painting?
At its core, diamond painting is similar to cross-stitch and paint-by-numbers. However, instead of using thread or paint, diamond painting employs small resin drills, often referred to as “diamonds.” These diamonds are faceted and come in various colors, which, when placed strategically on a canvas, create stunning, shimmering works of art.
Understanding the Materials
To embark on your diamond painting journey, you need a few essential materials. The key components include a canvas, adhesive layer, diamond drills, and tools. The canvas is printed with a design, and it acts as the foundation for your artwork. The adhesive layer covers the canvas, with numbered or symbolized areas indicating where to place the diamonds.
The diamond drills, often made of resin, are tiny and shimmering, lending an elegant touch to the final piece. Finally, tools such as a diamond applicator pen, wax pad, and tray help you pick up and place the diamonds with precision.
Preparing for Diamond Painting
Before you start diamond painting, it’s important to set up a suitable workspace. Choose a well-lit area where you can comfortably work for extended periods. Organize your diamond drills by color using storage containers or resealable bags, making it easier to locate specific shades during the painting process.
Additionally, when selecting a diamond painting kit, consider the design complexity, canvas size, and the quality of the materials included.
The Process of Diamond Painting
The process of diamond painting can be both relaxing and rewarding. Here’s a step-by-step guide to get you started:
Step 1: Unroll and Prepare the Canvas
Carefully unroll the canvas on a flat surface and ensure it lies flat without any creases. Use weights or heavy books to flatten the canvas if needed.
Step 2: Peel Back the Protective Film
Gently peel back a small portion of the protective film covering the adhesive layer. Be cautious not to remove the film entirely to prevent the exposed adhesive from collecting dust.
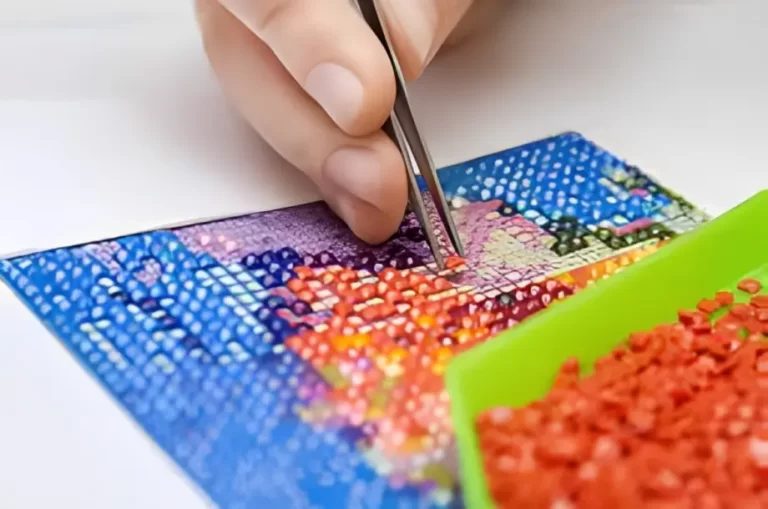
Step 3: Pick Up Diamonds
Take your diamond applicator pen and dip the tip into the wax pad. This will help the pen pick up the diamond drills. Press the pen’s tip onto the flat side of a diamond, and it will stick to the pen due to the wax’s adhesive property.
Step 4: Place Diamonds on the Canvas
Refer to the canvas’s legend, which corresponds the symbols or numbers to specific diamond colors. Locate the corresponding symbol or number on the canvas, and carefully place the diamond drill onto the adhesive, using a gentle pressing motion. Repeat this process for each diamond, working your way across the canvas.
Step 5: Finishing Touches
Once you’ve placed all the diamonds, take a moment to ensure they are secure and evenly aligned. You can use a rolling pin or your hands to apply gentle pressure across the canvas to ensure a strong bond between the diamonds and the adhesive layer.
Tips and Tricks for Successful Diamond Painting
To enhance your diamond painting experience, consider the following tips and tricks:
Enhancing Your Diamond Painting Experience
Diamond painting offers room for creativity and personalization. Here are a few ways to enhance your diamond painting experience:
Finishing and Displaying Your Diamond Painting
Once you’ve completed your diamond painting masterpiece, it’s time to give it the finishing touches and find the perfect way to display it:
Conclusion
Diamond painting is a captivating art form that allows you to unleash your creativity while finding moments of relaxation and fulfillment. By understanding the process, exploring different techniques, and embracing your own unique style, you can create stunning 5D dimensional diamond paintings that truly reflect your artistic vision. So, grab your canvas, diamond drills, and let your imagination sparkle.